1. Create the Project and Player
This chapter creates a clean project, configures its PS1 identity, and uses the native first-person preset. The preset is important: it creates a complete, compatible controller stack instead of asking you to assemble movement and camera components manually.
Create an Empty Project
- Launch Polygon Engine and wait for the Project Hub.
- Select New Project....
- Enter
Two Room Relayas Name. - Choose a writable Location outside the Polygon Engine installation.
The editor creates a
Two Room Relayfolder inside that location. - Set Template to New Blank Project (recommended).
- Select NTSC for a 60 Hz tutorial build. PAL also works, but use one region consistently through the tutorial.
- Select Create Project.
The project opens with Scenes/scene_main.json. Do not edit the scene JSON or
anything under Library/ by hand.
Configure the PS1 Project Identity
Open Project > Project Settings... and set:
| Setting | Tutorial value | Why it matters |
|---|---|---|
| Project Name | Two Room Relay | User-facing project identity |
| Disc Image Name | TWO_ROOM_RELAY | Generated disc output name |
| PS1 Executable | RELAY.EXE | Valid uppercase PS1 8.3 filename |
| Far Distance (world units) | 24 | Keeps ordering precision practical for this compact level |
| Save File ID | TWO_ROOM_RELAY | Unique 1-20 character memory-card identifier |
| Save Display Title | TWO ROOM RELAY | Title shown by memory-card tools |
Keep the generated default budgets. Select Save before closing Project Settings.
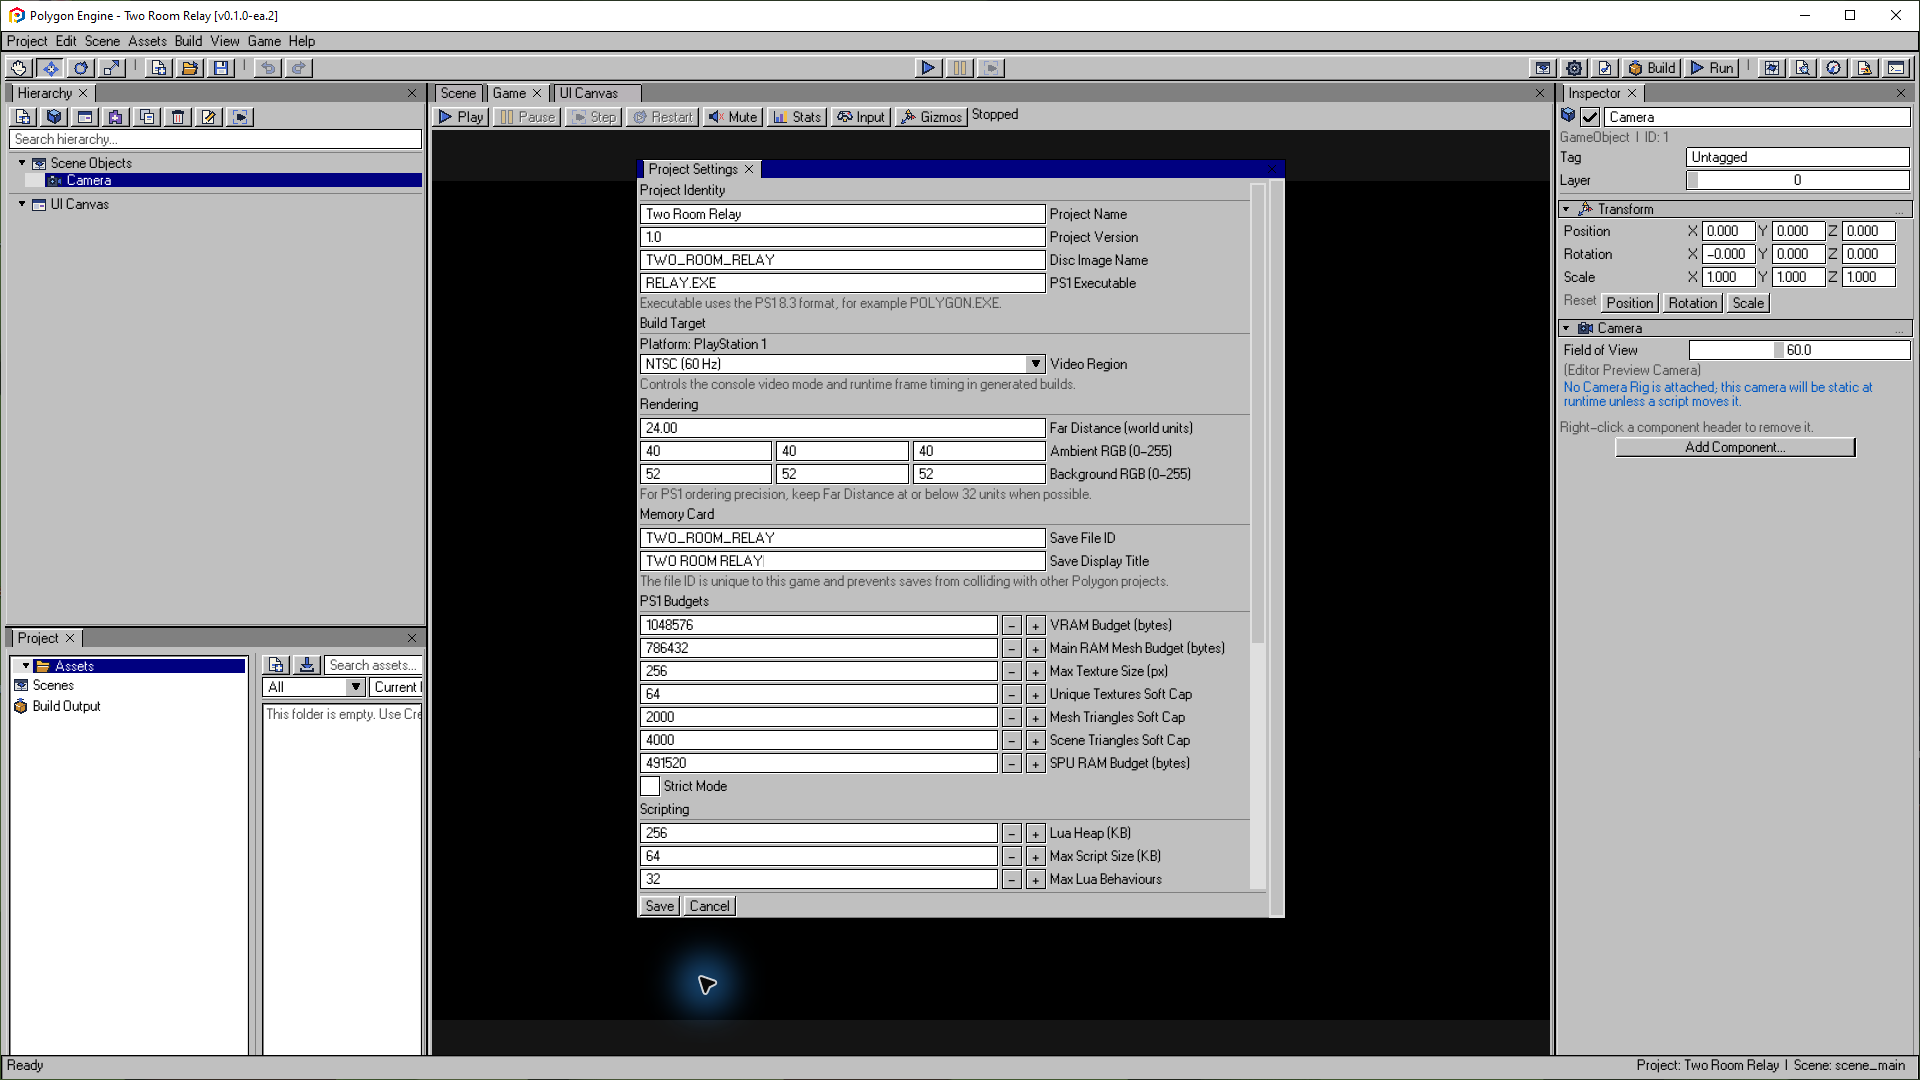
Use these project settings before building the rooms. Select Save to apply the changes.
Open the image to view it at full size.Create the Native First-Person Player
- Make sure no GameObject is selected as a parent in the Hierarchy.
- Select Scene > Create Entity > Player > First Person Player.
- Rename the new root GameObject to
PlayerwithF2. - In its Transform, set Position to
(0, 0.55, 2.0). - Set Rotation to
(0, 180, 0)so forward faces the doorway at negative Z. - Leave its scale at the generated value.
- Select the original root GameObject named
Camera, click the Hierarchy trash button, and confirm Delete. KeepPlayer Camera, the child ofPlayer. The blank template camera is not needed and would otherwise take priority in Play Mode.
Polygon Engine also creates Player Camera as a child. It is the gameplay
camera after removing the blank template camera. The player preset already includes:
- Collider and Character Controller;
- Player Input and Player Motor;
- First Person Controller;
- Interaction Ray;
- Spawn Point;
- a child Camera with a first-person Camera Rig.
Do not add a visible Mesh Renderer to the first-person player. A visible body on the same GameObject can place the camera inside its own geometry.
Confirm the Controller Mapping
Select Player and inspect Player Input:
| Input | Default tutorial behavior |
|---|---|
| Left stick or D-Pad | Move |
| Right stick | Look when an analog controller is active |
| Circle | Run |
| Cross | Interact or submit a focused UI button |
Keep Control Scheme set to First Person. The generated dead zone and look sensitivity are good starting values. You can tune them later without changing runtime code.
For editor testing with a keyboard, use W/A/S/D to move, I/J/K/L to
look, Shift to run, Enter or Space for Cross, and F9 for Square.
Click the Game view before testing. Once the tutorial adds UI buttons, use
I/J/K/L to look because the mouse remains available for the UI.
Checkpoint 1
Press Ctrl+S, enter Play Mode, enable Input in the Game view toolbar, and confirm:
- enable Stats and confirm that Camera reads
Player Camera; - the input status shows GameController or Joystick when your controller is connected; Keyboard indicates that no controller is detected;
- left-stick or D-Pad input changes movement state;
- right-stick input changes look state on an analog controller.
There is no floor or room geometry yet, so a blank Game view and a falling player are expected. Select Player to see its live position in the Inspector, check that movement and look inputs change the Input overlay, then stop Play Mode. We will test visible movement and collision after building the rooms.
Continue with Build Two Rooms.