4. Add UI, Audio, and Save Data
This chapter turns the gameplay logic into a readable player experience. You will import one texture and one short sound, create authored UI, connect button callbacks, and confirm the memory-card identity.
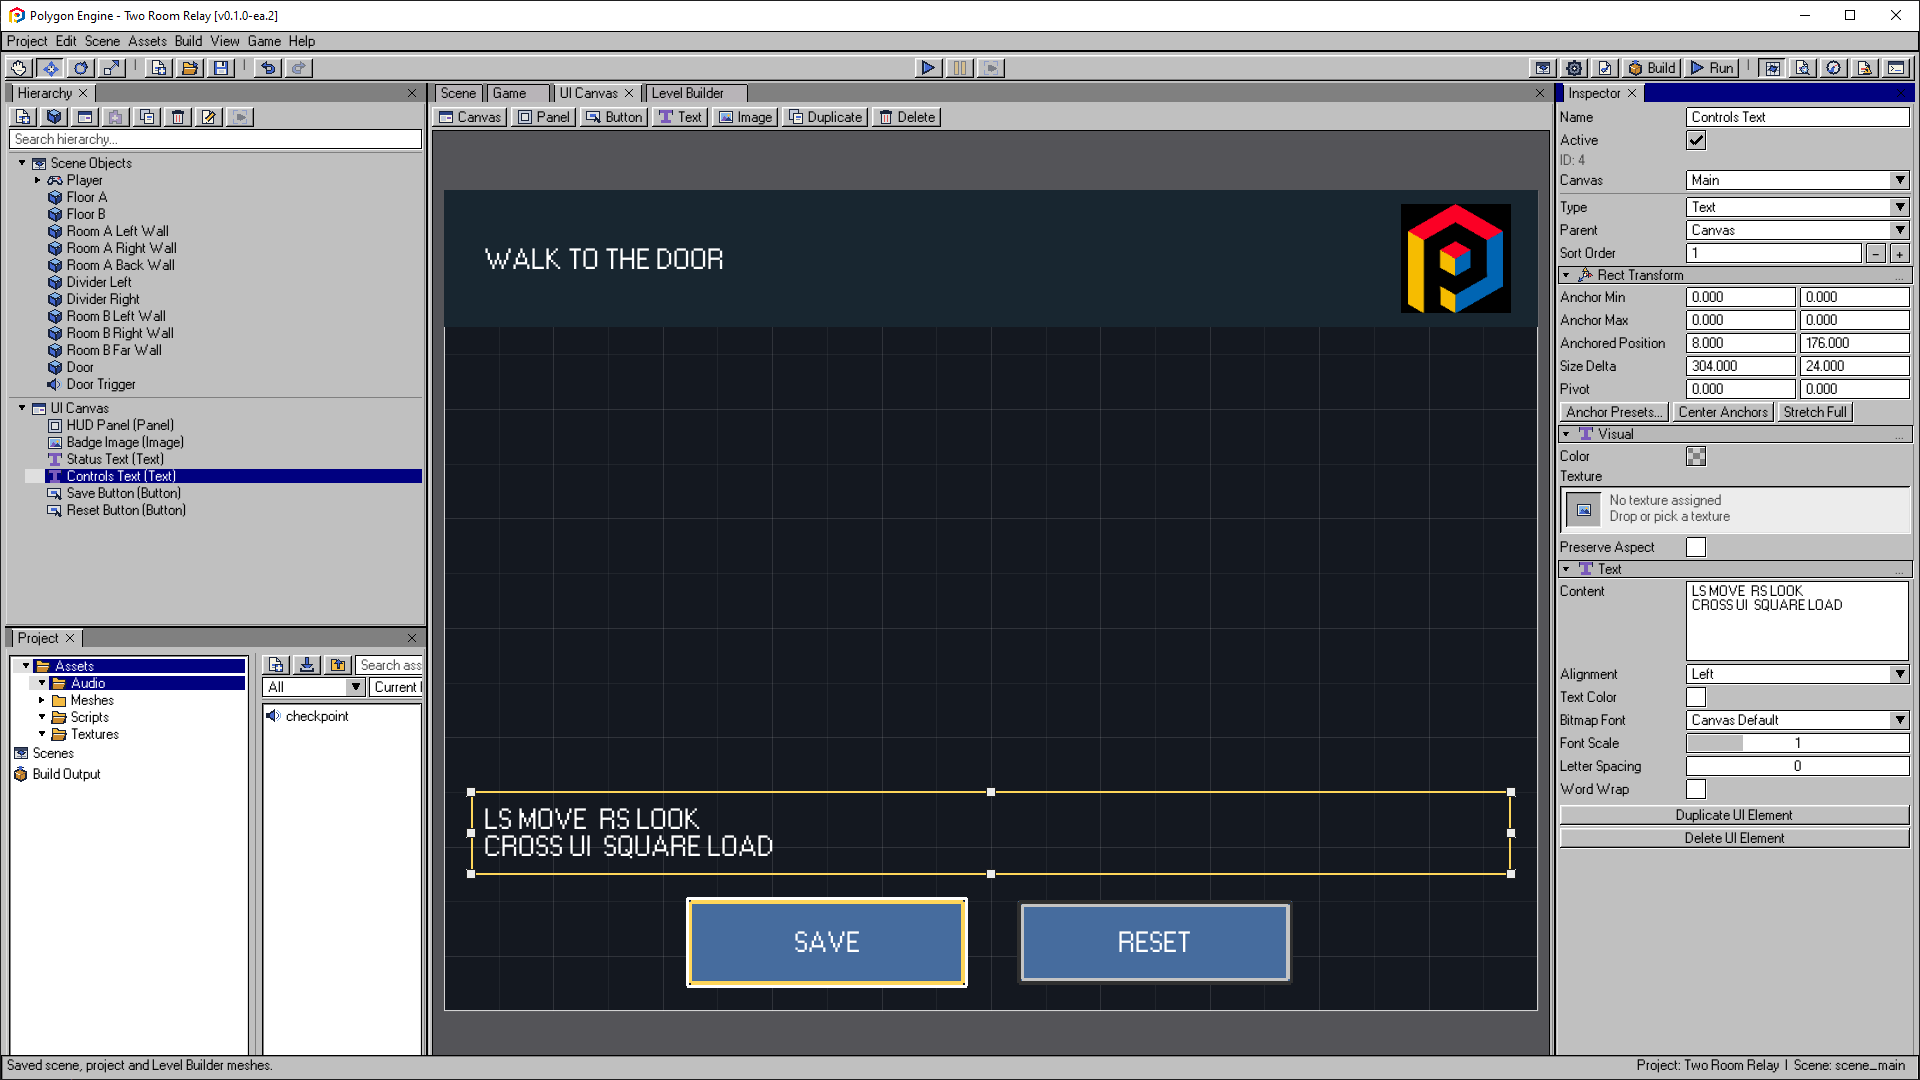
The finished 320 × 240 HUD: status and badge at the top, two lines of controls above Save and Reset. The Inspector shows the Controls Text position, size, anchors and multiline Content field.
Open the image to view it at full size.Import the Tutorial Assets
Download the files if you have not already:
Copy them into the project:
Assets/Textures/polygon_badge.bmp
Assets/Audio/checkpoint.wav
In the Project panel:
- Select
polygon_badge.bmp. - Use the PS1 4bpp preset. Keep alpha disabled and select Apply.
- Select
checkpoint.wav. - Set Target Sample Rate to
22050, leave Loop and Streaming Music (CD-XA) disabled. Files are imported automatically; select Apply & Import if you changed these settings, or Reimport to repeat the conversion.
The badge now has a texture GUID and the sound has a resident VAG output. The sound is intentionally short so it consumes very little SPU RAM.
Add Audio Feedback
- Select
Door Trigger. - Choose Add Component > Audio Source.
- In Select AudioClip, choose
checkpointand select Select. - Set Volume to
0.8. - Disable Loop and Play On Start.
The Lua script already calls AudioSource.Play(gameObjectId) when the door opens
or a checkpoint is saved. Because the Lua Behaviour and Audio Source share
Door Trigger,
no extra audio GameObject ID is required.
Enable the UI Canvas
Open View > Show UI Canvas. Select the UI Canvas root in the Hierarchy and
confirm:
- Enabled is active;
- Reference Width is
320; - Reference Height is
240.
Create each element with the UI Canvas toolbar. Before each creation, select
the UI Canvas root; otherwise the selected element can become its parent.
In each element's Inspector, set Parent to Canvas and keep it on
Main. This makes the coordinates below independent of previous selection.
In Rect Transform, set Anchor Min, Anchor Max, and Pivot to
(0, 0) for every element. Use these top-left pixel positions and sizes:
| Type | Name | Anchored Position | Size Delta | Content |
|---|---|---|---|---|
| Panel | HUD Panel | 0, 0 | 320, 40 | Dark background, Sort Order 0 |
| Image | Badge Image | 280, 4 | 32, 32 | Texture polygon_badge, Preserve Aspect enabled |
| Text | Status Text | 8, 8 | 264, 24 | WALK TO THE DOOR |
| Text | Controls Text | 8, 176 | 304, 24 | LS MOVE RS LOOK followed by a new line and CROSS UI SQUARE LOAD |
| Button | Save Button | 72, 208 | 80, 24 | SAVE |
| Button | Reset Button | 168, 208 | 80, 24 | RESET |
Enter the two lines of Controls Text with Enter inside the Content field.
Set the foreground elements' Sort Order to 1. Use white Text Color,
left alignment for text, centered button labels, and contrasting button fills.
Keep the built-in font at its normal size. The script splits long status messages at 32 characters to fit the built-in PS1 font, using two lines inside
the 63-byte text field; the Console retains the full diagnostic. Inspect both
lines in the preview. Bitmap-font wrapping can be added later through the
font workflow.
Use a short name exactly as shown. Lua calls UI.Find() by name, so Status Text and Save Button are part of the gameplay contract.
Assign Badge Image by dropping polygon_badge into its Texture field or
selecting it from the texture picker. Use the 32, 32 Size Delta above. Set Native Size is optional and replaces
the size with the imported dimensions, so restore the tutorial size afterward.
Connect the Buttons to Lua
Select Save Button and open its Interaction section:
| Field | Value |
|---|---|
| Interactable | Enabled |
| Automatic Navigation | Enabled |
| Target Entity | Door Trigger |
| Function | saveNow |
Configure Reset Button in the same way, but set Function to
resetProgress.
With only two buttons, automatic navigation is sufficient. The script focuses
Save Button in Start. D-Pad changes focus and Cross invokes the selected Lua
callback. A Button target must be a GameObject with the referenced Lua Behaviour;
targeting the Door GameObject would fail because it has no behavior script.
Understand the Save Flow
The project already uses:
Save File ID: TWO_ROOM_RELAY
Display Title: TWO ROOM RELAY
The tutorial uses typed PlayerPrefs values. PlayerPrefs.Save() persists the
complete key/value store. On PS1, this uses one 8,192-byte block on the Memory
Card in Port 1. In editor Play Mode, it writes a local save file with the
same key and value limits. Save failures are reported by
SaveData.GetLastError().
The tutorial uses four keys:
two_room_relay.door_open;two_room_relay.x;two_room_relay.y;two_room_relay.z.
That is well below the 32-entry project limit.
Checkpoint 4
Press Ctrl+S, enter Play Mode, and validate this order:
- The badge, status text, controls text, and both buttons are visible.
- Cross on
Save Buttonchanges the status toCHECKPOINT SAVEDand plays the sound. - Walking into
Door Triggerdisables the door, updates the status, and plays the sound. - Move into Room B and press Square. The player returns to the saved position.
- Focus
Reset Buttonand press Cross. On a successful save, the player returns to the chapter-start position in Room A, the door becomes enabled, and the status changes toPROGRESS RESET.
If UI appears but a button does nothing, verify its Target Entity and Function fields character-for-character. Continue with Test and Build.
Square loads the last saved checkpoint. If saving fails after the door opens, restore card availability and use Save again. The door stays open so you can continue playing. Reset returns the player to Room A only after the cleared progress has been saved successfully.
Stop movement before using D-Pad navigation: movement and UI navigation share those buttons in this example.